Sunday, 29 May 2016

香脆烧汁花肉片 ~ Crispy Pork Belly in Simple BBQ Sauce


食谱取自 : 新新饮食@101

香脆烧汁花肉片

材料
500g 花肉 ( 冰硬 ,切成薄片 )
4 炸油

腌料 拌匀) :
1/2小匙
1/2大匙 生抽
1/4小匙
1/4小匙 胡椒粉
1/2小匙 麻油
1大匙 绍兴酒
1大匙 粟粉

汁料 拌匀) :
1大匙
1大匙 生抽
1小匙
1大匙 急汁
1小匙 麻油

材料 A :
1大匙 蒜茸
3 指天椒 ( 切粒 )
1 红辣椒 ( 切碎 )
1 青葱 ( 切粒 )

做法 :
1. 把花肉切片加入腌料拌匀,腌1小时。放入热油里炸至金黄香脆,捞起,沥干油。

2. 把汁料放入锅里煮滚,加入炸好的肉片和 A料炒匀即可。

Recipe source : YumYum Magazine @ No . 101

Crispy Pork Belly in Simple BBQ Sauce

Ingredients :
500g pork belly ( freezed until firm and cut into slices )
4cups oil for deep-frying

Marinade ( Mixed ) :
1/2tsp salt
1/2tbsp light soy sauce
1/4tsp sugar
1/4tsp pepper
1/2tsp sesame oil
1tbsp Shaoxing wine
1tbsp cornstarch

Sauce ( Mixed ) :
1tbsp water
1tbsp light soy sauce
1tsp sugar
1tbsp Worcestershire sauce
1tsp sesame oil

Ingredients A :
1tbsp chopped garlic
3 chilli padi ( chopped )
1 red chilli ( chopped )
1 stalk spring onion ( chopped )

Method :
1. Combine sliced pork with marinade and mix well . Marinate for 1 hour . Deep-fry in hot oil until golden brown and crispy . Dish and drain .

2. Pour sauce ingredients in a pan amd bring to boil . Add in crispy pork belly , ingredients A and stir-fry until well mixed . Dish up and serve .

金瓜蒸蛋 ~ Steamed Pumpkin Egg


食谱取自 : 美味风采 @ 69

金瓜蒸蛋

材料 A :
180g 金瓜
5 鸡蛋
150g 上汤
2茶匙 粟粉

材料 B :
1 蛋白 ( 打散 )

调味料 A :
1茶匙 浓缩鸡精
盐少许
1汤匙

调味料B :
1/2 上汤
盐少许
1茶匙 粟粉

做法 :
1. 金瓜去皮,籽,切片蒸熟,然后放入搅拌机加入上汤打烂成金瓜泥。

2. 鸡蛋打散加入调味料A,搅拌均匀,加入金瓜泥充分混合均匀。

3. 把混合料过沥碗中,用慢火蒸约10 ~ 15分钟至熟,取出。

4. 把调味料B煮滚,熄火后倒入蛋白拌匀,然后淋入金瓜豆腐上即可。


Recipe source : Oriental Cuisine @ No.69

Steamed Pumpkin Egg

Ingredients A :
180g pumpkin
5 eggs
150g broth
2tsp corn flour

Ingredients B :
1 egg white ( beaten )

Seasoning A :
1tsp concentrated chicken broth
Dash of salt
1tbsp cooking oil

Seasoning B :
1/2cup broth
Dash of salt
1tsp corn flour


Method :
1. Skinned and seeded pumpkin , and then slices to steam and blend finely in blender .

2. Beaten eggs and mix with seasoning A , and then add in pumpkin puree .

3. Strain mixture into small bowl and steam in low heat for 10 ~ 15 minutes or until cooked  .

4. Bring seasoning B to boil , then set off the heat and toss in egg whote and then pour on top of pumpkin egg to serve .

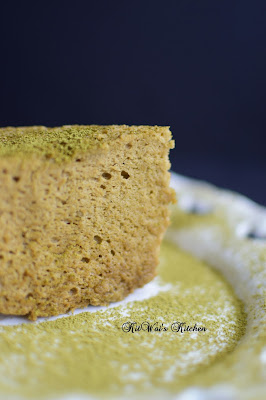
绿茶天使蛋糕 ~ Green Tea Angel Cake


食谱取自 : 天使蛋糕 @ Kevin Chai

绿茶天使蛋糕

材料 :
120ml  鲜奶
1g  
70ml  玉米油
85g  低筋面粉
7g  绿茶粉
220g  蛋白
2g  塔塔粉
80g  细砂糖

做法 :
1. 准备17寸圆形烤盘,底部铺上油纸。预热烤箱160c , 备用。

2. 在搅拌盆将鲜奶,盐,玉米油,面粉,绿茶粉和50g 蛋白搅拌均匀,备用。

3. 在搅拌机将剩余的蛋白和塔塔粉打发至粗泡沫状,将细砂糖分次加入,继续打发至硬性发泡。

4. 把蛋白霜分次加入鲜奶糊中,搅拌均匀成面糊。

5. 把面糊倒入烤盘,铺平,盛入烤箱烘约30分钟至熟 ( 我用150度 烤60分钟 )。取出倒扣在架子上待冷却。

6. 把蛋糕从烤盘取出, 即可切片。

Recipe source : Angel Cake by Kevin Chai

Green Tea Angel Cake

Ingredients :
120ml fresh milk ( I replaced it with chocolate flavor fresh milk )
1g salt
70ml corn oil
85g low protein flour
7g green tea powder
220g egg whites
2g cream of tartar
80g caster sugar

Method :
1. Line a bottom of a 7-in baking tin with greaseproof paper . Preheat oven to 160c.

2. In a mixing bowl , stir fresh milk , salt , corn oil  , flour , green tea powder and 50g of egg whites until well combined .

3. In a mixer , whisk the rest of egg whites with cream of tartar until soft peaks forms . Gradually add in sugar , continue whisk until stiff peaks forms .

4. Gradually fold the egg white foam into milk mixture until forms batter .

5. Spread batter into cake tin . Bake in oven for 30 minutes or until cooked ( I baked for 60 minutes @ 150c ) . Remove and leave to cool on wire rack .

6. Remove cake from cake tin , slice and serve .

柠檬天使蛋糕 ~ Lemon Angel Cake


食谱取自 : 天使蛋糕 @ Kevin Chai

柠檬天使蛋糕

材料 :
120ml  鲜奶
1g 
70ml  玉米油
50g. 自制柠檬酱 / 市售柠檬酱
2大匙 柠檬汁
1大匙 柠檬皮屑
100g  低筋面粉
220g  蛋白
2g  塔塔粉
60g  细砂糖

做法 :
1. 准备17寸圆形烤盘,底部铺上油纸。预热烤箱160c , 备用。

2. 在搅拌盆将鲜奶,盐,玉米油 ,柠檬酱 , 柠檬汁,柠檬皮屑 ,面粉和50g 蛋白搅拌均匀,备用。

3. 在搅拌机将剩余的蛋白和塔塔粉打发至粗泡沫状,将细砂糖分次加入,继续打发至硬性发泡。

4. 把蛋白霜分次加入鲜奶糊中,搅拌均匀成面糊。

5. 把面糊倒入烤盘,铺平,盛入烤箱烘约30分钟至熟( 我用150度烤60分钟 )。取出倒扣在架子上待冷却。

6. 把蛋糕从烤盘取出, 即可切片。


Recipe source : Angel Cake by Kevin Chai

Lemon Angel Cake

Ingredients :
120ml fresh milk
1g salt
70ml corn oil
50g store bought lemon filling jam / homemade lemon curd
2tbsp lemon juice
1tbsp grated lemon rind
100g low protein flour
220g egg whites
2g cream of tartar
60g caster sugar

Method :
1. Line a bottom of a 7-in baking tin with greaseproof paper . Preheat oven to 160c.

2. In a mixing bowl , stir fresh milk , salt , corn oil  , lemon jam , lemon juice , lemon rind , flour and 50g of egg whites until well combined .

3. In a mixer , whisk the rest of egg whites with cream of tartar until soft peaks forms . Gradually add in sugar , continue whisk until stiff peaks forms .

4. Gradually fold the egg white foam into milk mixture until forms batter .

5. Spread batter into cake tin . Bake in oven for 30 minutes or until cooked ( I baked for 60 minutes @ 150c ) . Remove and leave to cool on wire rack .

6. Remove cake from cake tin , slice and serve .

Monday, 23 May 2016

古早味咖啡软蛋糕 / 夹心蛋糕 ~ Coffee Cream Cake


食谱取自 : Bibi's Baking Journey

古早味咖啡软蛋糕 / 夹心蛋糕 

材料 A :    6寸戚风蛋糕体  / 6寸四方模 ( 我用7寸四方模,所以全部材料乘1.36 )
60g  特幼低筋面粉 过筛2 ,去除杂质
3 蛋黄  
20g 细砂糖  
45ml 温水
7g 即溶咖啡粉  ( 即溶咖啡粉和45ml温水泡好 , 待用 )
10ml 咖啡酒
25g 玉米油  

材料 B : 
3 蛋白  
25g 细砂糖
1/8 茶匙 塔塔粉( 我没放

牛油霜材料 :
150g 室温软化牛油
60g  过筛糖粉
1 1/2大匙 咖啡酒

牛油霜制作步骤 :
把全部材料用搅拌机搅打至松发,即可.

装饰 :
100g 炒香花生碎

做法 :
1. 蛋黄糊 : 蛋黄和砂糖拌至糖溶解,加入玉米油,咖啡酒拌匀 ,最后把面粉和咖啡液交替加入拌均匀.

2. 蛋白霜 : 取个无水无油干净的盘,把蛋白放入 ,用电动搅拌机把蛋白打至起泡泡,加入塔塔粉,再分3次加入砂糖,打至硬性发泡 ( 短而挺的小湾勾状 ).

3. 1/3的蛋白加入蛋黄面糊中拌匀。把剩余的面糊倒入蛋黄糊中轻轻拌匀。 ( 以翻拌方式混合均匀,千万不可用转卷方式 。因为这方式会让蛋白消泡 ).

4. 倒入模里,轻轻敲出气泡。放入预热烤箱,以150-160度,烤约45-50分钟。

5. 烘烤后,立刻取出倒扣,待完全凉后才脱模。

 
组合蛋糕 :
1. 把冷却的蛋糕横切成2片,在1片蛋糕抹上适量的牛油霜。然后盖上另外一片的蛋糕,抹上牛油霜,再撒花生碎在表层,即可。


Recipe source :  Bibi's Baking Journey

Coffee Cream Cake

Ingredients A :
60g superfine flour ( sieved 2 times )
3 egg yolks
20g castor sugar
45ml warm water
7g instant coffee powder ( mix with 45ml warm water )
10ml Kahlua
25g corn oil

Ingredients B  :
3 eggs white
25g castor sugar
1/8 tsp cream of tartar ( I omit it )

Butter Cream ingredients :
150g butter ( in room temperature )
60g sieved icing sugar
1 1/2tbsp kahlua

Method :
Mix all ingredients in a mixing bowl , beat till fluffy .

Garnishing :
100g toasted crushed peanuts

 
Method :
1. Mix egg yolk and sugar in a bowl ,  using a balloon whisk mix until sugar dissolve . Add in corn oil and kahlua , mix till well combined . Fold in flour and coffee mixture , mix until there are no more lumps and form a smooth batter . Set aside .

2. Whisk egg whites until mixture forms soft peaks, and gradually add in sugar in 3 batches , whisk until frothy and stiff peaks form.

3. Fold in 1/3 of meringue, gently fold with egg yolk batter till slightly combined. Fold in the balance meringue and gently fold till well combined.

4. Pour cake batter into pan . Tap pan on the counter top to remove air trapped inside the batter. Bake at pre-heated oven at 150 ~ 160c for 45 ~ 50 mins or until cooked. .

5. Revert immediately to cool before unmoulding .

 
Assembly the cake :
1. Using a sharp knife, cut the cake horizontally into 2 layers.  Turn over the top layer of the cake ( top of cake becomes bottom) and place on your serving plate. Spread some butter cream on top of it . Place the second layer of the cake on top of the cream . Decorate the top of the cake with butter cream and sprinkle some toasted crushed peanuts .


九层塔香酥素鸡 ~ Aroma & Crispy Vegetarian Nuggets


食谱取自 : 新新饮食@100
 
九层塔香酥素鸡
材料 :
500g  香酥素鸡
2大匙 粟米粉
1大匙 九层塔碎
4大匙 木薯粉
腌料 :
1  1/2大匙 多用途咖喱粉
1大匙 生抽
 
做法 :
1. 把香酥素鸡放入大碗里,加入腌料拌匀,腌30分钟。
2. 加入粟米粉和九层塔碎拌匀,再裹上木薯粉,待1分钟至回潮。
3. 放入热油里,用大火炸至金黄色,捞起,沥干油,趁热上桌。
 
 
Recipe source : YumYum Magazine @ No.100
 
Aroma & Crispy Vegetarian Nuggets
Ingredients :
500g vegetarian chicken meat
2tbsp cornstarch
1tbsp chopped Thai basil leaves
4tbsp tapioca flour
Marinade :
1 1/2tbsp multipurpose curry powder
1tbsp light soy sauce
 
Method :
1. Put vegetarian chicken meat into a mixing bowl , add in marinade and mix well . Season for 30 minutes .
2. Add in cornstarch , chopped Thai basil leaves and mix well . Coat with tapioca flour and leave stand for 1 minute ,
3. Deep-fry in hot oil at high heat until golden brown .Dish and drain , serve immediately .